GOLF DRILLS & TIPS
Back Home
Warming up to your golf game.
Dont risk injury, take a few minutes to do a few simple warm up exercises and basic stretches.You've probably been sitting in a car for 20 minutes or more, so get out and walk around a bit.Shake your arms and hands for 30 seconds. Put a golf club behind your back and hook your arms around the club at the elbow joint and do some easy turning and mock golf swings. This is a goodway to help you limber up. Swing 2 clubs for a minute or two. Now use 1 club, put your feet togetherand swing normally for a few minutes. You are basically warmed up and the muscles are stretched too.Try to do them before every golf outting.
Keeping fit and Injury free
Coming soon!
BALANCING YOUR GAME 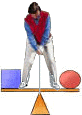
- MAKE A SHOULDER WIDTH STANCE
- BENT KNEES SLIGHTLY
- BALANCE WEIGHT EQUALLY ON THE BALLS OF YOUR FEET
- HOLD CLUB OUT IN FRONT OF YOU IN BOTH HANDS AS IF FISHING
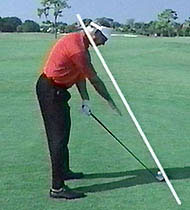
COMPLETING THE TRIANGLE
- LOWER YOUR ARMS UNTIL THEY TOUCH YOUR CHEST
- BEND FORWARD FROM THE HIP AND WAIST UNTIL THE CLUB TOUCHES THE GRASS
- (DO NOT HUNCH OVER OR BEND NECK)
- WHERE THE CLUB TOUCHES THE GRASS IS YOUR BALL POSITION
Using this guideline everytime you hit a shot will give you many advantages: consistency of setup & preshot routine and proper balancing & posture. You will gain confidence that you have the ball placed at the exact spot your body needs it in for maximum contact and power.
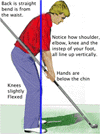 POSTURE
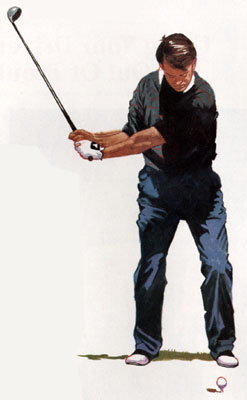
The way you stand over the ball at address is sometimes overlooked. It is one of the key fundamental / foundational elements for a good and consistent golf swing. It is a determining factor for balance, weight shift, swingplane. Improper posture can contribute to many of the swing faults: including slicing, hooking, dubbing, chili dipping, and inconsistent / irratic and varying problems. So as you can see its worth careful consideration and could be thecause of a multitude of problems including having a good shot followed by a bad shot, having a good round 1 day followed by a bad round, or of late round problems due to fatigue causing improper posture. In general a good posturestarts with the proper shoulder-width stance, flexing knees and a straight spine. The bending is forward at the waist only. Avoid bending the neck and spine as the diagram shows. Standing straight up with .shoulders squared up with the feet to the target line, look down at the feet slowly bend the knees until they cover the shoelaces of your golfshoes. Let your arms hang down; they should be pointing at the tips of your shoes,adjust the waist angle to achieve this. Move the hands together: this is where the club should be held with a good posture, get very used to and very comfortable with where this point is. With a club in hand, after the posturesetup, allow the club to come to rest on the ground, this is the final ball placement, it may be the same or different from the "General Ball Placement Procedure" above. An additional posture check is to imagine a line running from the ground thru your instepthru the knee joint thru the elbow joint and finally exiting thru your shoulder joint. These should all line up on both sides of your stance.
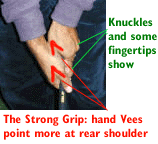
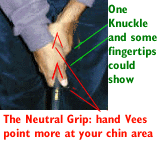
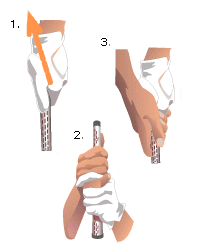
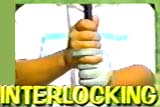
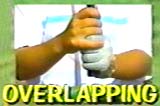
Here's a look at a grip You have a choice with how to connect the dominant hand on the club:
1.Baseball grip- hands are separated,yet thumb of undominant hand is still under dominant hand for all 3 choices.
2.Interlocking - the undominant's index links through the dominant's pinky and ring fingers.
3.Vardon / Overlapping- the dominant's pinky overlaps between the undominant's index & middle finger knuckle region. If you practice with them : one of the 3 will feel the best for you.
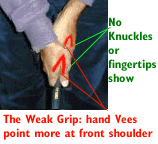
Note the V-shape crease made by the thumbs and hands, roll your hands to point these Vees at the dominant hand's shoulder. This is a good (neutral to strong) grip. Since the majority of golfers complain about slicing a (neutral to strong) grip can help them counter-act the slice.
Here are diagrams of the 3 grip positions.(Right Hand View, Left Handers should reverse diagrams)
A Strong Grip favors a Draw Shot / Neutral Grip favors Straight Shot / Weak Grip favors a Fade Shot
 *****
***** *****
***** ***
***
Please note: The club head is fixed behind the ball, aiming at the hole during this check.
Finding the right grip sizeTo check to see if your grips are the correct size is simple. For a right handed player (left-handed use the opposite hand) place your hands on the club in your normal manner. Then, remove your right hand and take a look how your left hand is seated on the club. The fingers of the left hand should just touch the palm. If you have a gap your grip is too big or if your fingers are 'digging in' your palm your grip is toosmall. Another sign of a grip that is too small is excessive glove wear. Remember incorrect grip size cancause many problems within the swing so take the time to check this simple point. Did you know you could use your grip to dial in a fade or draw?
Want to build an inexpensive swing plane trainer.?
Equipment :
- Some kite string or old clothesline
- A wooden stake or large nail
- 1- 8foot2x4 board
- 7 nails
- Something to anchor the board to the ground (U-shaped rod, heavystones wooden stakes etc.).
Assembly: Tie some string or clothesline to a stake in theground, make a good postured stance and address a ball 3 or 4 inches inside the stake, have a friend stretch the string over a branch or pole so that when tawt the string grazes your neck and is just above your shoulder.
GolfCents' Famous Broom drill
try for 1 week minimum @ 20 minutes a day , 5 minute sessions)(This is one of those curealls for Most golf problems, the most complex problems usually have a very simple cause and an even simpler fix.)Take a heavy wisk broom , go out on the patio or walk(I recomend thesidewalk so you can use the line of the walk as your target line) hold thebroom handle like a golf club(proper grip) address a point on the line you can (mark the spot with chalk)and swing the broom like a golf club.
Swing that broom every day for a week, your only thought is to have it sweep down the line consistently and hit the spot along the way , what will happen is your body will try to make this heavy object as easy and efficient to swing as possible, you may not notice it right away but your body will optimize: balance, timing, weight shift, swing plane, proper arm and shoulder motion, increase and stretch the proper golfing muscles, it will eliminate over-use of the wrists, and about 10 more things... Even if you try to swing it wrong you will immediately get the feedback: in the form of losing your balance, sore wrists,grounding the broom,or falling over.
Do you see where this is going yet?One simple drill, inexpensive too, so howcan it be any good if its virtually free....try it for 1 week and see for yourself.
GolfCents' Famous 3 Leaf Drill
{Corrects swing path/plane problems,flight curvatures and alignment errors )Establish a target and the line to target. .Lay a rope or spare club on the lineto target, butt your feet to the line and also align shoulder at target too. You are now square to the target. Place three leaves on separate line to target:leaf #1 is the imaginary ball, leaf #2 is 5-6 inches in front of leaf 1, while leaf #3is placed 5-6 inches behind (leaf #1) target<<<.........#2..........#1............#3.Practice : address leaf #1 and make a short backswing and follow through ,your goal is to hit all 3 leaves: Hit leaf 3 on the takeaway/backswing, and hit the middle and front leaves(#1 & #2) on the downswing, slowly add more length to your practice swing , until you progress to a full swing.
Try this with the different clubs , the only change is for irons leaf #1 is in center to rear of center of stance , and the wood shots are more forward, towards the inside heel of the front foot.
GolfCents' Famous Cutting the Weeds Drill 
(I'm not the only one to endorse this one, The Great Harvey Penick also did calling it "clipping tees")
(As a kid I made many yard/landscaping tasks into mini swing training sessions) This one is easy to do if you have an old style weed cutter (it looks like a hocky stick with a sharp leading edge, if you dont have one try an eight iron ).
Your quest is to hold and swing it like a golfclub, with the target or victim being tall grass, weeds and dandelions. Your quest is to sweep through the target, NOT AT IT!!!! Get the feeling of cutting right through the stem or blades of grass. This drill helps the golfer learn to hit through the ball and not at it. You simply swing club and the grass / ball gets in the way of the cutter's / golfclub's, swing path.
Many golfers lose distance and shot crispness because they dont accelerate through the ball.
[[ See Ball Postion or Irons versus Woods , for positioning of the ball within the stance. ]]
GolfCents SwingPlane Drill :
Ok whats this swing plane jargin??? There is an imaginary plane or line that the arms-hands and club follows. Think of your head popping out of the slope of your roof,like a chimney. Your swing plane is on the same angle as the roof line and should remain parallel to it during the swing. We can simulate this by forming a right triangle. Your heels are at the right angle, the hypotenuse or longest side(the roof slant)is slanting across your neck to a point about 3 or 4 inches further than the ball position. Your Posture setup works together with the swingplane. So if you seem to be out of plane recheck your posture. You can check your swing plane with very little effort or cost.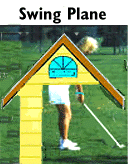
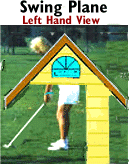 See diagram. This is the correct angle of your swing plane at the point of impact & address . At this point you can add more strings to check your self at different points in your swing arc. To do this connect several strings to the same point(purhaps connected to a large washer) on the string that is stretched over the branch or pole( it should resemble the support strings on a hammock). Next : Place an 8 foot - 2 by 4 board along the target line but about 3 or 4 inches further from your feet. Put in 5 or 7 nails or screws spaced out equally from the center. The center screw will get the original 1st string that was staked into the ground. Connect the extra strings to the nails and pull tawt.(Note you will have to anchor the 2 by 4 into the ground. )You should wind up with a string with several strings fanning out from one point to the points on the 2 by 4, but on and forming your predetermined swing plane. ///|
Gee wiz, when am I going to get a scanner for pictures. You now have a swing plane training aid , COST is under $3.00 , if you need to buy the equipment.
Once you have made your swing plane trainer, practice making full swings,I recomend using the broom in combo, and or a club with the 3 leaf setup in combo. Your goal is to never go outside the swing plane guide, yet staying parallel to it throughout the swing arc. Ive seen swing trainers for $1000, what a rip off!!!
GolfCents Chipshot Drill :Benching or Bagging your chipshots. What exactly does this mean??? Well the school of thought for many teachers is that great chip shots are on the ground and rolling ASAP!!! I believe in this too unless there is an obstacle: a series of mogles, groundwater, damaged turf, sprinkler head, etc., between you and the hole.
One of the ways to help people get the feeling of getting the ball rolling As Soon As Possible is to block out the possiblity of hitting a high chipshot. To to this use the blocking device of your choice: chipping under a bench, a chair, the lower rail of a fence, or one of my favorites, if you dont like calling attention to yourself chipping through th slanting legs of the golfbag holder.
The choice of club should be whatever club you can accomplish this with, I recommend a 7 iron to start.( NOTE:the hands lead the club at impact with no wrist-action!) You should forward - press your hands in front of the ball. The ball is played in the center to rear of center of your stance and should be hit before the club hits the ground. (NOTE: the hands lead the club at impact. Try to make equal backswing and follow through and keep the tempo / timing the same. Think one.......... and ............two. Let the backswing length control the distance to the cup, DO NOT add power or wrist snap for more distance. This will only make your chipshots in consistent. I also believe that different clubs should be used depending on the circumstances. For instance lets say you have one foot of fringe to go over and forty feet of green to the hole: I would say a 7 or 8 iron chip and run would be appropriate. Now lets say you have 3 feet of rough and 2 feet of fringe to get over and the pin is another 10 feet away: in this case a softer wedge shot is needed. Experiment with unique situations and you will start to select the proper club and type of shot with greater ease and with better results. Remember having to chip is not a negative result of missing or coming up short of the green. It's just another shot at the target. Look at the chip shot as an opportunity to hole out and impress your golfing buddies. If you believe the chip shot will go in, it has a good chance to do so. Visualize the ball rolling in just like a putt, then make the shot. Also remember to read the break of the green just as in putting, pick a spot to land and let the ball follow the contour of the green into the cup. Practice will make you better.
GolfCents on Putting Breaks
Many golfers see a golf hole as tee to green and forget its tee to cup. They plan out where to place a drive, and a 2nd shot on a par 5. They have a few minutes between each shot to organize or recompose their thoughts, on the green, however the putts come very quickly. " I always say "on a green you gain the most strokes in the shortest amount of time" and its true. Take the timeto read the green: as you approach it, as you mark your ball, or pull the flag , or fix a ball mark .You can sneakily get several views of your putting line without doing the pro-walk.
What's the PRO WALK? The pro gets a view from back of ball , then walks to the side, then all the way around the hole , then he gets up to the hole and looks back to the ball , then around the other side and completes the cycle back behind his ball again. Try this one time on your course and not only will your golfing partners yell at you , but the ranger will throw you off the course or worse yet the groups being held up behind you will start hitting warning balls at you. The point is you can get a couple of views without holding anyone up. Try to be the good neighbor and pull the flag , this is the most important view, the curves nearer the hole will affect your ball more because it is rolling slower by then and forward momentum is minimum. While your there take a look at the cup's surrounding area.
A lot of amateur greenskeepers cut a new cup the wrong way, that is, they pull the cylinder of dirt out of the ground with out the hold-down plate. This creates a volcano that slopes on all sides of the cup. Guess what, the speed just before the cup is at itsslowest point and if you are one of those finesse putters(let the ball die into the cup) you are in for some disappointing results. The volcano's slope deflects the ball away from every direction .Youve seen this before: a perfect putt that stops just before the hole or veers off just before the hole, even when its a flat line to the cup and it seemed as if the putt had more than enough to get there. What they didnt see was the 3 inch perimeter of the hole that was transformed into a tiny green volcano. I wonder if they do it on purpose
Putting Technique
Putting techniques vary among golfers, so here are some of the tips I 've heard from people I consider to be great putters:
src= _fcksavedurl="" src = "puttngreen.gif" align = right>
- Swing a putter like a Pendulum, equal back and forward swings.
- Keep the v shape formed by the arms constant.
- Let the putts die into the hole (to give luck a chance)
- In contrast : Never up never in , if the ball doesnt reach the cup
it will never go in, but if you give the ball enough roll to reach the
cup (at least a foot past) you have a better percentage to make more putts.
- Keep the pace & tempo of the swing constant, use the length of
the swing to set the distance.
- Line up the logo of the ball with the cup.
- Pick a spot along the line of the putt, but closer to you and in
the range of your peripheral view and roll the ball over the spot.
- Align your putt, then close your eyes and trust your swing.
- Putt looking at the hole, not the ball , "you dont look at a dart or
the bat or the basketball in your hands do ya"
- Get used to the feel of one brand of golf ball and your putts will drop.
- Keep you eye over the ball
- Hit the ball like a driver, the putter should be on the upswing to hit
the ball at its center to give it a forward roll, this eliminates the back
and side spins that occur in the first few inches when you hit under its
center. This causes the ball to go off the intended line.
-
See the putt drop in your mind's eye before you take the backswing.
There are so many theories out there and so many that work. So see what works best for you , and which one you feel the most confidence with. If you need putting help try some of the techniques that others had success with. I hope that something you've read here today helps or inspires you. Try this site it claims to be:The World's most comprehensive golf putting resource! Geoff Mangum's Magic Wand Putting Instruction
GolfCents on Making the Practice Range Count
Most golfers can probably say that they have visited a driving range at least one time. If you walk along the driving range boothes you can see a wide variety of swings, stances, attitudes, and the results of all this is a variety of shots. Some people are trying to get their iron shots to hit the nearby greens, while others are grunting and swinging with all their might , trying to blast one over the 250 sign. It is here where I see a big problem. Too many think they have to kill the ball for power, yes they do occaisionally get a few shots to actually go at the sign. These golfers will be miserable when they get to the course, their shots will be erratic, they will lose many balls and waste so much time in the woods that they will often forget why they are on the course in the first place. Continuing down the line we find people hooking, slicing, and hitting worm burners. Amongst all this are a few smooth and easy swinging people hitting consistent shots and with good power. A closer look will show you that they are practicing with a purpose, they hit a few with one club then move to another, some are writing down distances, some are making mental notes on what they did to add a draw or fade to their arsenal, etc. etc.
For the troubled golfers out there, please take the time read and go through the drills I have shared with you on the golfguru / GolfCents site. They have been tested over time and have helped many struggling golfers see a way out of the pit. Do the drills to completion, then go to the practice range, ONLY THIS TIME WITH A PURPOSE. What purpose? You ask . Do the drills and you will know.
GolfCents' Driving Range Challenge:
Warm up your muscles for a few minutes by walking up and down the rows of boothes, also use this time to pick out the better players and see how they approach thepractice session. Swing 2 clubs around to loosen up & stretch the arms, shoulders and the other golfing muscles. I like to start with the middle irons 6,7, & 8 , because they aren't the heaviest or the lightest. If you are hitting them ok , move on to the other clubs for a few hits each. If you feel confident then move onto the GolfCents Challenge game. The goal is to simulate a day at the course, you can even bring a score card to help you along. Start on hole 1 on the score card, set up some fairway limit boundaries like in between the 150 yard sign and the 100 yard green, or what ever you choose. If the score card says #1 is a par four then play it as a Par 4, use strategy, estimate your next club as a result of the tee shot you hit. Remember if it goes outside the limits , take 2 strokes and hit another tee shot and continue the hole. Think also about where your shot went and the layout of the hole youre simulating. For instance if its a dogleg right and you push your tee shot , you must try to play as it would be on the course, so try to aim left and fade a shot onto the green or whatever the situation calls for. Use one of the greens for the approach shot, if you hit the green take a 2 putt, unless you hit it real close. If you're close to a putting green then use it for the practice game putts, this is even better practice. Have fun, while you purposely practice and learn this great game called golf.
Bye Hook or Bye Slice
 How many of you have hit the perfect tee shot......perfect at least for the first couple of seconds,But then you stand there helplessly watching it bend off line into the rough, or a trap, or a pond or the woods. You wish someone had an answer, but all the professional instructors and / or magazine articles cant seem to help you. Why????? There are a few reasons.
Reason 1:The teaching pro's are stringing you along like a cash cow. You are money in the bank and a long term investment to them.
If they cant fix your hook or slice in a ? hour or at least 1 hour, there's something wrong. Ask them if they guarantee a cure for a hook or slice in 1 lesson or 2 or no charge. If they cant ask them why. Try to get them to commit to some time limit. If they cant cure the problem they shouldnt be teaching.
Reason 2: They honestly cant find the problem or the cause.
If they cant fix your hook or slice in a half hour or at least 1 hour, there's something wrong. Ask them if they guarantee a cure for a hook or slice in 1 lesson or 2 or no charge. If they cant ask them why. Try to get them to commit to some time limit. If they cant cure the problem they shouldnt be teaching.
Neutralize 1st!
Reason 3: They dont know how to solve the problem.
If they cant fix your hook or slice in a ? hour or at least 1 hour, there's something wrong. Ask them if they guarantee a cure for a hook or slice in 1 lesson or 2 or no charge. If they cant ask them why. Try to get them to commit to some time limit. If they cant cure the problem they shouldnt be teaching.
Neutralize 1st!
Reason 4:Multiple problems causing one result.
This one is very annoying to an instructor. They do whats written in their little golfing manuals, yet nothing seems to work.
Neutralize 1st!
Reason 5: Their attempt at repair caused another similar fault to occur, nulling out, the correctionSometimes in the attempt to fix they cause more problems or dont realize that their correction is causing a counter-problem. For instance lets say you have a slice : the
 instructor goes by the book and closes your stance (this normally promotes a draw ) but he doesnt see that the shoulders have inadvertently opened more (this promotes a big slice), this is like the counter-punch in boxing. The net result is a slice to some degree.
Neutralize 1st!
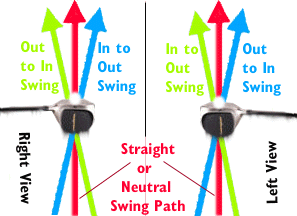
Reason 6: I think 5 is enough!!!What to do . Neutralize 1st! OK........OK what is this Neutralize 1st! all about? Its all about geometry : arcs, circle, square, triangle, lines, and intersecting lines. Dont get scared, this is not a Math Test. All you need to know is what they look like ...still with me??? Take a look at the picture diagrams: you will see these curves, angles and lines. When I mention Neutralize its the:
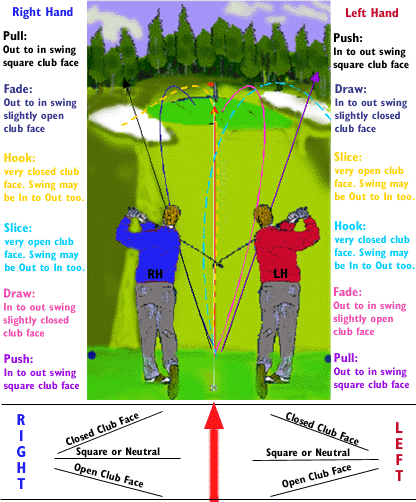
Getting back to the lines and curves: an open or closed club face on a straight swing path will cause the ball to sidespin-which in turn makes the ball curve of line. The amount of curve is proportional to the degree off square. 5 degrees open will induce less spin than 15 degrees open. More side spins equates to more curve in flight.
Now take a look at the Push and Pull shots: they are not curving, yet are off line, these are Squarely hit shots, but the swing path for each is off the line. The result is a straight yet misaligned shot.
Neutralizing gets rid of all the bad habits,the over compensating, the need for extra wrist rolling(Pronation of Dominant Hand). I see instructors adding all this extra movement,wrist-rolling, overturning, pivoting, extreme gripping, extreme stancing, messing around with what should be a simple swing and making it into the complex series of exact angles and movements that ALL need to be sequenced correctly or else it is disasterous.
If you neutralize 1st you can swing the club as it should be :in its purest and simplest form, this is the easiest form to keep in time with. In case you missed it here is the Neutralizing Process:
Remember to have fun and study the game, so your Golfsense gets sharper.
The truth about lies
Every golfer at some time has had an unlevel lie. If you wondered if there is a way to approach these shots????....... well there is .
The following is an example of situation and the way to remedy it or adjust to it.
-
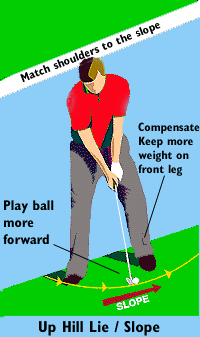
Up Hill Lies
(Lead foot higher than Rear foot)
- Footing: more weight on the upper foot (front)
- Set shoulders to match the slope of the hill, this will help with balance.
- Play the ball more forward to compensate for amount of slope.
- Make several practice swings to help get used to weighting and balance as well as the point of ground impact (for ball placement)
- Think: solid contact, dont shift weight,keep legs quiet, and dont overswing
-
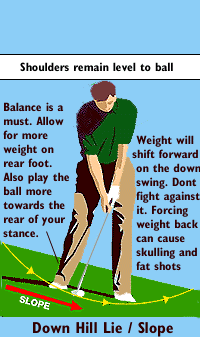
Down Hill Lies
(Rear foot higher than Lead foot)
- Footing: more weight on the upper foot (rear foot)
- Set shoulders to level to the ball, this will help with balance.
- Play the ball back more to compensate for amount of slope.
- Make several practice swings to help get used to weighting and balance as well as the point of ground impact (for ball placement)
- Think: solid contact, allow weight to shift ,keep legs fairly quiet, and dont overswing
- Keeping weight back on the downswing can lead to fat or skulled shots
-
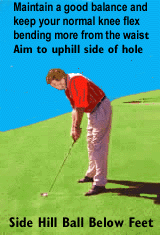
Side Hill Ball Below Feet Lies
- Footing: balanced- keep more weight towards the heels,
- Keep your normal knee flex .
- bend a little more from the waist
- Aim inside the target line (As if playing for a fade)
-
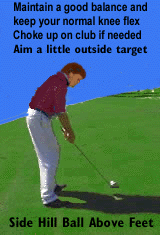
Side Hill Ball Above Feet Lies
- Footing: balanced - get weight over toes more.
- Maintain Good Posture
- Choke up on club to compensate for severe slope
- Aim outside the target line (As if playing for a draw)
- sandtrap in each of these scenarios is pretty much the same
-
When chipping it is similar,
_____________________________________
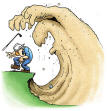 Son of a Beach I'm in a Sand Trap !!!
- The Green side and short distance technique
- Relax, Grab your Sand wedge, and dont panick
- Remember you cant ground the club in the sand until impact
- Grounding the club is a PENALTY
- Determine distance to the hole
- Take a slightly open stance
- Play ball in center of stance
- Address a spot 1 to 2 inches behind the ball
- If your at a greenside bunker, use the approximate swing length that would land the ball in the hole on a fly.
- The sand will absorb some of this force
 Swing through the spot you chose and Dont Stop your swing
- The Club will glide through the sand, never contacting the ball
- The column of moving sand actually lifts the ball up and out
- The ball may or may not come out with extra back and side spin
- Sand consistency, depth and moisture content affect spin
- When properly executed :Sand shots land softly, acurately and tend to bite.
-
I have holed out or come close to it many times using this technique.
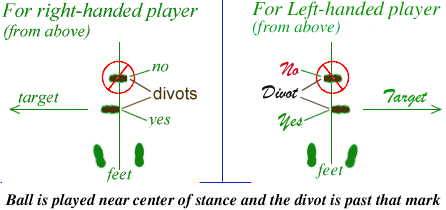
, while woods are played front of center, withthe Driver off of the inside heel of the lead foot?Visualize a clock face and the parts of the golfswing. The top of the swing is 12:00, while the bottom or lowest point is 6:00. The iron shot is hit with the descending part of your swing let say 5 to 5:30.Note this is just before the lowest point. This puts the ball in the path of the swing a little earlierwhile the club is still decending. The club hits the ball then the ground, therefore any divot is after where the ball was. The ball rides up and off the clubface with a reverse(back) spin. This back spin gives the iron shot green holding bite.
PLease note DONT hit at the ball or drive it straight into the ground, take a smooth easy swing and let the ball simply get in the way of the club's path, before it hits the ground.
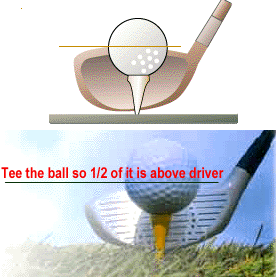
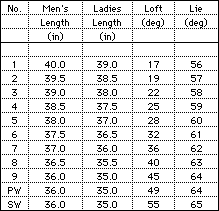
The wood shot,in contrast, is hit after 6:00 when the club is past center and rising in the swing path. The wood shotis more like a sweeping action. The more forward of center that the ball is positioned the higher offthe ground the club will have risen. This is why the ball is properly teed up with about half of the ballabove the driver's clubhead at initial address. Note NO changes in your swing have been made or suggested.Swing the same way and at the same tempo, there is no reason to swing harder for a driver than there is for a wedge shot...Trust Me On This One.....OK ... Smooth and easy, think of 1 ......2....... for the swing1......2....... Find your perfect tempo and use it for all your full shots and you will start hitting with more power, consistency and accuracy. Here is a handy chart of Irons
it has average shaft-lengths, loft angles and degrees of Lie.
Example of Squaring up and The Neutral Stance versus an Open & Closed Stance. .( these 2 steps have cured somany slicing/hooking problems , that I lost count ) Repeat both : until both are 2nd nature and comfortable to you .
BALL-Placement: .Completing the triangle The third leg of the stance is the target-ball's placement.Since every club is different in length we need a general Ball-placement guide for every club.
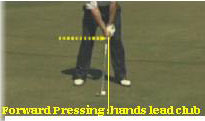
Irons are played at center and rear of center, using a FORWARD PRESS. Woods are played front of center, withthe Driver off of the inside heel of the lead foot. ? ? ? Why were at it what about Ball height for Driver Tee Shots???
Why is the ball position different for irons and woods??? click me
Balance & .Square your stance. Take an 8 iron and use your normal grip, Stand straight up, with knees slightly bent. Hold the club out in front of you ,waist high and in the center of your feet. Slowly bending atthe hips only lower the clubhead straight down, (you may have to bend the back muscles depending on your flexibility).Where the club meets the ground is a great place to put your target ball. You may want to try this with eyes closed a few times too, see if you can hit the same mark each time. Repeat this with all the clubs; the Driver position requires the most stretch. Repeat the trio until its 2nd Nature....For Weight-shift, Timing, Tempo and a lot more go to the Broom Swing Drill at this point.
Balancing: Take a shoulder width stance, knees slightly bent , balance your weight on the insides of your feet (on the ball and inner heel) 50% on each foot. Practice getting into this balanced position until it's 2nd Nature to you.
Squaring Up Lay a rope or club along a target line and butt your feet to this line, at this point align the shoulders to the target too.